What you're going to build
A 58-second branded marketing video, rendered to MP4, ready to drop into a LinkedIn post, a sales email, a landing page, or a paid ad campaign. This is the video. Press play.
It walks through the four-step workflow you're about to learn: lock your brand, brief each scene, preview live, render. The brand colors, fonts, and layout come from one config file. Every variant — different headline for ICP A, different stat for ICP B, localized in Spanish — is one more prompt away.
You don't need to know how to code. You need to be able to open Terminal, paste a command, and write clear briefs in plain English. The AI does the rest.
What you need before you start
Three tools, all free or already installed:
- Node.js 18 or newer. If you don't have it, download from nodejs.org (pick the LTS version, click through the installer).
- Google Chrome. The renderer uses headless Chrome to turn scenes into video frames. You almost certainly already have it.
- Claude Code. Anthropic's CLI tool. Install instructions at docs.claude.com/claude-code. If you have a Claude account, the setup is about three minutes. New to Claude Code? Here's how to get running in your first hour.
Time budget for your first video: about 60 to 90 minutes from blank folder to rendered MP4. Every subsequent video — including every variant of the first one — takes 5 to 15 minutes.
No prior coding required. You will see some code on your screen during this tutorial. You will not be writing it. Claude Code writes it. You direct it.
Step 1: Spin up the project (5 minutes)
Open Terminal (Mac: Cmd+Space, type "Terminal," hit Enter). Navigate to wherever you keep projects and run:
npm create video@latest my-marketing-videoYou'll get a few prompts. Pick the Hello World template, choose TypeScript, and let it install. The whole thing takes about 90 seconds.
Then move into the folder and start the preview server:
cd my-marketing-video
npm run dev
Your browser opens to http://localhost:3000 and you'll see Remotion Studio, the in-browser preview environment. There's a default Hello-World composition playing. You're going to replace it.
Now open Claude Code in the same folder (run claude in a new Terminal tab). You're ready for Step 2.
Step 2: Lock your brand (10 minutes)
This is the most important step in the whole tutorial. Get it right once and every video you ever build in this project inherits the right brand automatically.
Give Claude Code this prompt, with your actual values swapped in:
Create a file at src/constants.ts that exports our brand kit. Five colors: primary dark [paste hex], accent [paste hex], white #FFFFFF, soft neutral [paste hex], hairline border [paste hex]. Two fonts from Google Fonts: headline [your font name], caption mono [your mono font name]. Also export a SCENES map with timing for each scene we'll build. Make sure src/Root.tsx loads both fonts using @remotion/google-fonts.Claude Code will create the file, wire up the fonts, and confirm it's ready. The whole brand kit now lives in one place. If you ever want to test a new accent color, change one hex code, re-render, and every scene updates.
If your headline font isn't on Google Fonts, upload the .woff2 or .otf file and tell Claude Code to wire it up locally. The cleanest move is to put it in public/fonts/ and reference it via a @font-face rule in src/Root.tsx. Claude will write the boilerplate.
What "the SCENES map" is: a plain object that lists every scene of your video and how many frames each one runs. It's the single source of truth for the video's timeline. You'll add to it every time you create a new scene. Nothing else has to change downstream — every scene's start time is computed from the previous one.
Step 3: Write your first scene with Claude Code (15 minutes)
This is where the magic happens. You're going to describe a scene in plain English. Claude Code will turn it into a working animated component. Remotion will play it back instantly.
Here's the exact prompt format that works:
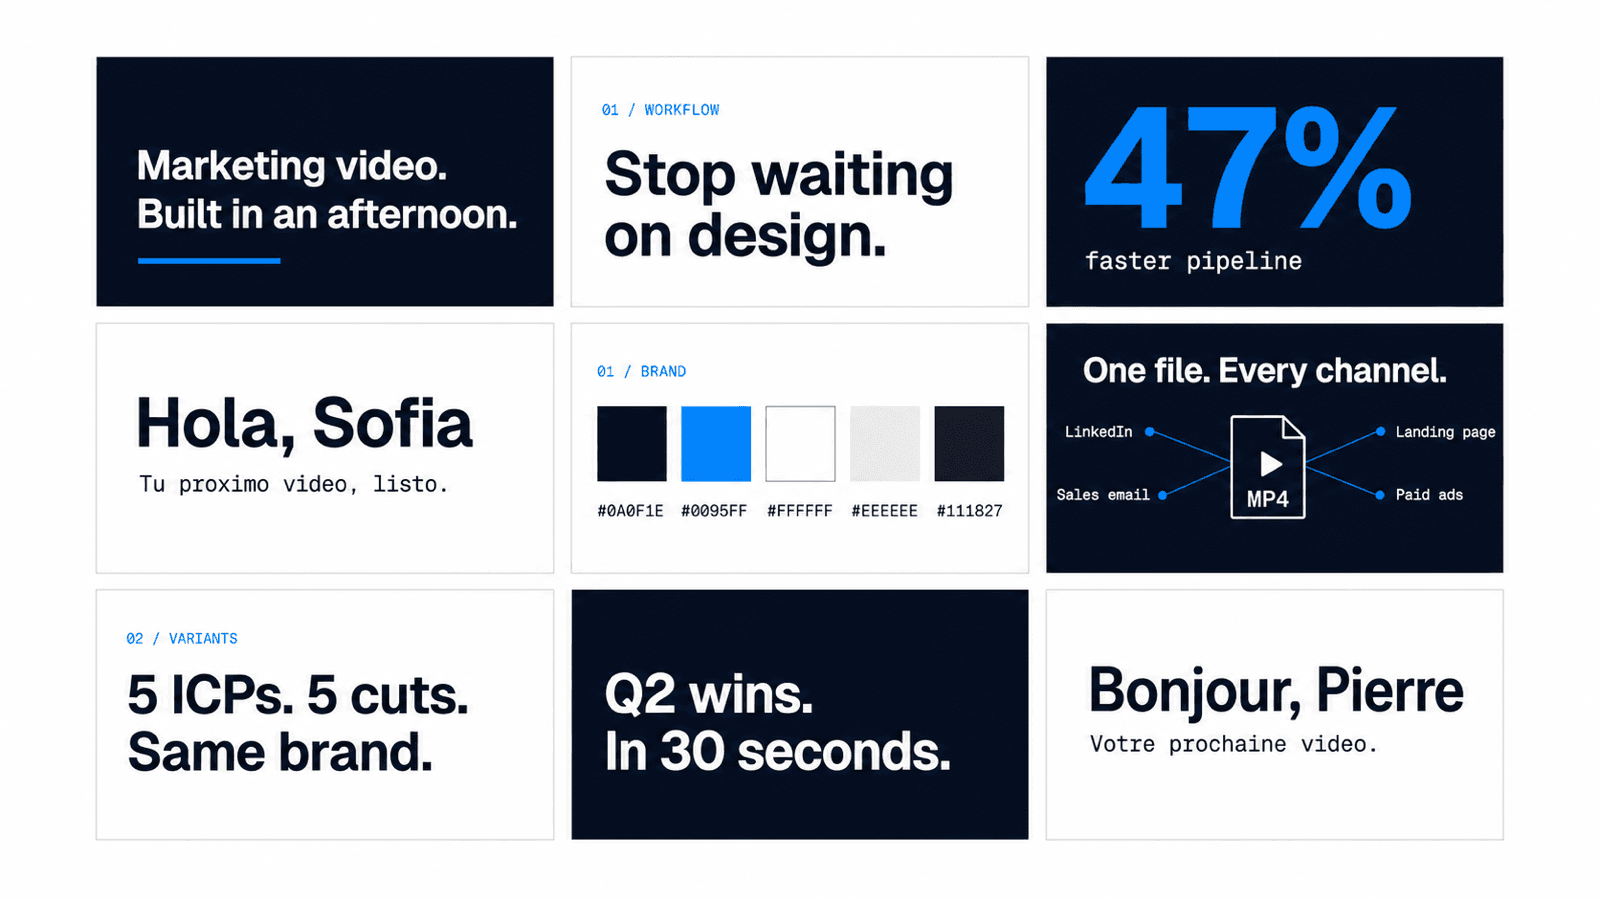
Write src/scenes/Title.tsx using my brand tokens from constants.ts.
Background: white.
Eyebrow at the top: "FOR / MARKETERS" in our accent color, all caps, letter-spaced.
Two giant headlines: "Marketing video." then "Built in an afternoon."
Each line is Geist, 160pt, our dark navy, springs in from below 20 frames apart.
Below the second headline, a 10px-tall accent-color bar draws in horizontally over 25 frames.
The brief has five parts that always matter:
- Background. White, dark, soft neutral. Set the mood first.
- Eyebrow. The little numeric label at the top — "01 / SETUP," "FOR / MARKETERS," "JUNE 2026." Optional but signature.
- Heading. The big sentence you want people to read.
- Visual elements. Cards, bars, file icons, color swatches, charts — describe them like you'd describe a slide.
- Motion. Springs in, fades up, draws in, scales from below. The vocabulary is the same one you'd use briefing a junior designer.
Once Claude has written the file, look at Remotion Studio in your browser. The scene plays instantly. If the first headline lands too fast, tell Claude:
The first headline lands too fast. Hold it for 15 frames longer before the second line springs in. Also make the accent bar 4px taller and slow its draw-in by 40%.You iterate in plain English. Claude makes the change. Remotion Studio reloads. You look at it. You iterate again.
Step 4: Preview live in your browser
Remotion Studio is the magic loop. Keep two windows open while you work:
- Your code editor showing the scene file you're working on.
- Your browser at localhost:3000 showing Remotion Studio with the canvas and timeline.
The Studio gives you four things that matter:
- Canvas. Shows the current frame, rendered exactly as the final MP4 will look.
- Timeline. Scrub left and right to jump to any frame in any scene. This is how you catch off-by-one timing bugs — a spring that's still going when the next scene starts, a stat that pops in too late, a card that fades out before its label appears.
- Composition list. If you have multiple compositions (different videos), they live in the left sidebar.
- Hot reload. Save a file in your editor and the canvas updates in seconds. No re-render, no waiting.
Your feedback loop with Claude Code looks like this: describe a change, save, scrub the timeline, eyeball the motion, give another prompt. You'll be running 5 to 10 of these per scene at the start, fewer as you internalize what works.
Step 5: Stitch scenes together
One scene is a clip. Eight scenes is a video. The wiring is one file: src/Video.tsx. Tell Claude:
Update src/Video.tsx to play all eight scenes back-to-back using Sequence. Read scene durations from the SCENES map in constants.ts so the timing is in one place. Order: Title → Stack → Brand → Brief → Preview → Publish → Stat → CTA.That's all the orchestration you'll ever need. Scenes play in the order you list them. Each scene's start time is computed from the previous scene's duration, so when you make scene 03 a second longer, every later scene shifts automatically.
Each scene in your video might be:
- Title (your hook headline)
- Stack or Setup (what this is about)
- 3 to 5 content scenes (your actual message — features, stats, steps, ICPs)
- Stat moment (one big number that lands the point)
- CTA (where you want them to go next)
That's a 45-to-75-second video. The right shape for almost every channel.
Step 6: Render and publish
When you're happy with the preview, render to MP4 with one command:
npx remotion renderA headless Chrome window boots in the background, paints every frame, and encodes the result to h264. A 60-second 1920×1080 video at 30 frames per second takes 60 to 120 seconds to render on an Apple Silicon Mac. The output drops into out/.
Now the file is yours. Same MP4 works on:
- LinkedIn — upload as a native video for the strongest organic reach.
- Sales emails — embed the thumbnail with a play overlay that links to the video.
- Landing page hero — autoplay, muted, looping background.
- Paid ads — change the dimensions to 1080×1080 or 1080×1920 in
src/Root.tsxand re-render for square or vertical. - Demo intros, nurture sequences, event recap newsletters — same source, different cuts.
The variant playbook: where this actually pays off
Speed is the first unlock. Variants are the bigger one. You don't make one video. You make a template that makes videos.
Want the same 30-second ad in five languages?
Create out/es.mp4, out/de.mp4, out/fr.mp4, out/pt.mp4 by re-rendering the same composition with the Title headlines and the Stat labels translated. Spanish, German, French, Portuguese.Want a version for agencies, a version for in-house marketers, a version for sales leaders?
Make three variants of the Title scene. Variant A: headline for agencies — "Client videos. Without the queue." Variant B: in-house marketers — "Marketing videos. In an afternoon." Variant C: sales leaders — "Personalized prospect videos. At scale."Want one MP4 per prospect for a personalized sales play? Give Claude the CSV of prospect names and companies and ask it to render one video per row with the names woven into the scenes. The whole list renders overnight.
The mental model: a Remotion project is a template, not a video. Your job is to write the template once and treat every actual video as a variant of it. That's where the time savings go from "weeks to afternoon" to "every variant for free."
“The next year of marketing video isn't about who has the best designer. It's about who has the cleanest brand kit and the best prompts.”
Cool things to build with this
Things marketing teams are using this stack for right now:
- Daily LinkedIn micro-content — auto-render a 15-second branded clip every weekday from a Google Sheet of stats, quotes, or product wins. Schedule the post directly.
- Auto-generated stat videos — pull the top three customer wins from your CRM weekly, render a "what's working" video, ship it to a customer-marketing nurture sequence on autopilot.
- Personalized prospect videos — render one MP4 per account in your top 100 target list, with the prospect's name, logo, and one pain point woven in. Send via your sales sequence.
- Conference and event recap videos — feed the speakers list and session titles to Claude, render a branded recap clip per session, post each one with the speaker tagged.
- Founder LinkedIn at scale — turn each week's small moment — a customer win, a product ship, a lesson learned — into a 30-second branded clip. Same template, different brief.
- Investor and board update animations — render a one-minute branded summary from your monthly stats. Embed it in the board email.
- Multi-language paid ad variants — render every language you sell into as a separate MP4. Run them in parallel ad sets. Same brand everywhere.
The shape that works: short (30 to 90 seconds), typographic, branded, animated. The kind of video that ships every week, not the kind that ships every quarter.
Honest limits: when not to use this
This is the right tool for typographic, branded, animated marketing videos. It is the wrong tool for several common video jobs.
- Live-action footage editing. If you're cutting a multi-cam customer interview with color grading and transitions, that's still Premiere or DaVinci. You can drop a recorded clip into a Remotion video as a section, but you're not editing footage in here.
- Heavy audio work. Voiceover, music sync, sound design — Remotion supports audio overlay, but it's not a substitute for an audio editor. Record your voiceover separately and overlay it. For music, use a royalty-free track.
- 3D, character animation, or cinematic effects. If your video needs a 3D product render, motion-captured character, or particle simulation, hire a designer. This is for the 80 percent of videos that don't need it.
The sweet spot — and it's a large one — is the branded explainer, the LinkedIn ad, the landing page hero, the launch announcement, the stat reel, the customer story, the case study highlight. The kinds of marketing videos a team currently waits two weeks for. That's where this earns its keep.
The takeaway
You don't need a designer to make a branded marketing video anymore. You need a brand kit in a text file, a clear brief for each scene, and an AI that can write the code.
The unlock isn't that AI makes videos. The unlock is that the video is now a file your team can edit, fork, localize, and version-control. Every variant is a commit. Every localization is a swap. Every campaign is a fork of the last one.
The whole workflow is the six steps above. Start with npm create video@latest, lock your brand in constants.ts, brief each scene to Claude Code in plain English, scrub the preview, render the MP4. That's the loop.
The same build-it-yourself loop works beyond video. If you want to see it applied to a different surface, here's building a landing page with Claude Design end to end.
If you try this and ship something, send it over. We genuinely love seeing what marketing teams build when the design queue stops being the bottleneck.
Key Takeaways
- Branded marketing videos can be made in an afternoon, with no designer and no After Effects, using Claude Code and Remotion.
- Your brand kit (five colors, two fonts) lives in one file. Every scene reads from it. Off-brand variants become impossible.
- Each scene is a single prompt to Claude Code, written in plain English. No coding required from you.
- Remotion Studio gives you live preview in your browser with hot reload, so iteration is instant.
- One command renders the video to MP4 in 60 to 120 seconds. Drop it into LinkedIn, sales emails, landing pages, or paid ads.
- The real unlock is variants: same template, different prompts. Each variant is a commit, not a design ticket.